Latest News

Friday 28 June 2013

tehnik mengubah warna rambut dengan mudah


Dalam tips Photoshop untuk pemula ini, kita akan mencoba untuk mengubah warna rambut seorang wanita cantik dengan Photoshop. Gambar yang digunakan adalah gambar di bawah ini:
Cara Mudah Mengubah Warna Rambut Dengan Photoshop

1. Langkah pertama, jalankan program Photoshop dan buka gambar tersebut. Sebaiknya file gambar dicopy dulu supaya bisa dibandingkan antara gambar asli dengan hasil editnya nanti.

2. Selanjutnya, buat seleksi pada rambut yang akan diubah warnanya. Di sini saya menggunakan Pen Tool untuk membuat path pada rambut, lalu tekan CTRL+ENTER untuk mengubah path menjadi selection.
Cara Mudah Mengubah Warna Rambut Dengan Photoshop

3. Kemudian tekan CTRL+C untuk meng-copy bagian yang terseleksi tersebut. Lalu tekan CTRL+V. Sekarang layernya telah menjadi dua. Layer pertama adalah  gambar asli, dan layer kedua (yang sedang aktif) adalah berisi bagian rambut yang di-copy tadi.
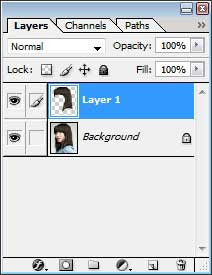
Cara Mudah Mengubah Warna Rambut Dengan Photoshop

4. Sekarang kita membuat variasi warna pada rambut tadi. Klik menu Image > Adjustments > Variations. Di sana sudah terlihat berbagai variasi warna rambut. Pertama, klik pada gambar Originaldulu (pada bagian atas). Gambar yang akan menjadi hasil adalah pada gambar Current Pick (pada bagian atas). Selanjutnya perhatikan gambar yang lain, di sana terlihat tulisan More Green (membuat lebih hijau), More Blue (membuat lebih biru), More Yellow (membuat lebih kuning), dan seterusnya. Pilih salah satunya sesuai warna yang kita inginkan, lalu klik beberapa kali sampai warna rambutnya cocok dengan keinginan  kita. Di sini saya meng-klik gambar More Red (membuat lebih merah) kira-kira dua kali klik, karena saya ingin membuat warnanya agak kelihatan coklat kemerah-merahan. Ingat agar selalu melihat gambar hasilnya (Current Pick). Jika telah selesai, klik tombol OK.
pilih warna rambut

5. Hasilnya akan terihat seperti ini:
Cara Mudah Mengubah Warna Rambut Dengan Photoshop

6. Selanjutnya, untuk merapikan warna di  sekitar pinggiran rambut yang mungkin saja warnanya melewati rambut, maka gunakan Eraser Tool.  Supaya lebih halus menghapus warna, setel Opacityke 50%, gunakan mode Brush, pilih hardness 0%, sedangkan master diameter pilih 10 (sesuaikan kebutuhan).
Cara Mudah Mengubah Warna Rambut Dengan Photoshop

7. Kemudian gabungkan kedua layer dengan mengklik menu Layer > Merge Down. Sekarang layernya tinggal satu.

8. Ulangi langkah 2 sampai 6 di atas untuk mengubah rambut di bagian kirinya. Maka kita akan mendapatkan hasil akhirnya adalah sebagai berikut:
Cara Mudah Mengubah Warna Rambut Dengan Photoshop

Berikut ini beberapa hasil dengan menggunakan warna lain:

rambut hijau  Cara Mudah Mengubah Warna Rambut Dengan Photoshop

tutorial photoshop ynamic Art using Glows and Lighting

Final Image Preview
Create Dynamic Art using Glows and Lighting Effects in Adobe Photoshop CS5
Start working by creating a new document (Ctrl+N) in Adobe Photoshop CS5 with the size 1000px by 1500px(RGB color mode) at a resolution of 72 pixels/inch. Use the Paint Bucket Tool (G) to fill with #0A2406 color the new background layer.
Create Dynamic Art using Glows and Lighting Effects in Adobe Photoshop CS5
Find a stock photo with a model represented on it, I used this Portrait of beautiful and sexy fashion woman fromShutterstock. I would like to thank the author of this photo, or if you prefer, you can substitute similar image of your own.
Create Dynamic Art using Glows and Lighting Effects in Adobe Photoshop CS5
Remove the background using your favorite tools like Pen Tool (P)Magic Wand Tool (W)Magnetic Lasso (L) or even a simple Filter>Extract and insert it on a new layer in our main document.
Create Dynamic Art using Glows and Lighting Effects in Adobe Photoshop CS5
Create now a new layer and select the Soft Round brush.
Create Dynamic Art using Glows and Lighting Effects in Adobe Photoshop CS5
Use this brush to paint the background as it is demonstrated on the next picture. The brush’s color is #D260C0. The layer will be placed under the woman’s layer.
Create Dynamic Art using Glows and Lighting Effects in Adobe Photoshop CS5
Set the Blending mode for this layer to Hue.
Create Dynamic Art using Glows and Lighting Effects in Adobe Photoshop CS5
Find a stock photo with fire on a black background:
Create Dynamic Art using Glows and Lighting Effects in Adobe Photoshop CS5
Insert it on our main document. Fire layer will be placed under the woman’s layer. Using the Free Transform (Ctrl+T) command, we may change the fire’s layer sizes if necessary.
Create Dynamic Art using Glows and Lighting Effects in Adobe Photoshop CS5
Insert the mask on last made layer by choosing Add layer mask on the bottom part of the Layers panel and choose the Soft Round brush of black color (set Opacity to 40% in Options bar).
Create Dynamic Art using Glows and Lighting Effects in Adobe Photoshop CS5
Paint in the mask using this brush to hide the fire’s layer along its edges. Set Fill to 70% for this layer.
Create Dynamic Art using Glows and Lighting Effects in Adobe Photoshop CS5
Next we’ll represent a triangle, choose the Pen Tool (P), set the drawing mode on Shape Layers in Options bar and draw the next shape as shown. The layer will be situated under the woman’s layer.
Create Dynamic Art using Glows and Lighting Effects in Adobe Photoshop CS5
Click on Add a layer style icon from bottom part of the Layers panel and select Drop Shadow.
Create Dynamic Art using Glows and Lighting Effects in Adobe Photoshop CS5
We’ve got the next result:
Create Dynamic Art using Glows and Lighting Effects in Adobe Photoshop CS5
Using the same tool, it’s possible to represent another triangle of white color. Place the layer under the model’s one.
Create Dynamic Art using Glows and Lighting Effects in Adobe Photoshop CS5
Set the Blending mode for this layer to Soft Light and add Drop Shadow style like on the previous triangle.
Create Dynamic Art using Glows and Lighting Effects in Adobe Photoshop CS5
Take the Pen Tool (P) to create near the recently made one, another triangle. Place the layer under the woman’s layer. The triangle’s color is gray.
Create Dynamic Art using Glows and Lighting Effects in Adobe Photoshop CS5
Set the Blending mode for this layer to Soft Light. Click on Add a layer style icon from bottom part of theLayers panel and select Drop Shadow.
Create Dynamic Art using Glows and Lighting Effects in Adobe Photoshop CS5
We’ve got the next result:
Create Dynamic Art using Glows and Lighting Effects in Adobe Photoshop CS5
Click Create new fill or adjustment layer from bottom part of the Layers panel and select Hue/Saturation.
Drag the slider to the left to decrease the Hue of the color range.
Create Dynamic Art using Glows and Lighting Effects in Adobe Photoshop CS5
The layer will be situated under the woman’s one.
Create Dynamic Art using Glows and Lighting Effects in Adobe Photoshop CS5
Set the Blending mode for this layer to Screen.
Create Dynamic Art using Glows and Lighting Effects in Adobe Photoshop CS5
Insert the mask on the last made layer by choosing Add layer mask on the bottom part of the Layers paneland choose the Soft Round brush of black color (set Opacity to 30% in Options bar).
Create Dynamic Art using Glows and Lighting Effects in Adobe Photoshop CS5
Paint in the mask using this brush to hide out the edges as shown, re-creating this way the flame.
Create Dynamic Art using Glows and Lighting Effects in Adobe Photoshop CS5
Create one more triangle, cutting the inside part of it, using the Pen Tool (P), select the Exclude overlapping shape areas from Options bar to cut the central part of the triangle.
Create Dynamic Art using Glows and Lighting Effects in Adobe Photoshop CS5
Set the Blending mode for this layer to Soft Light. Click on Add a layer style icon from bottom part of theLayers panel and select Drop Shadow.
Create Dynamic Art using Glows and Lighting Effects in Adobe Photoshop CS5
We’ve got the next result:
Create Dynamic Art using Glows and Lighting Effects in Adobe Photoshop CS5
Use the Pen Tool (P) to represent this time a white triangle with the previous layer’s parameters (Blending mode-Soft Light and Drop Shadow style). Place the layer under the woman’s layer.
Create Dynamic Art using Glows and Lighting Effects in Adobe Photoshop CS5
Create a new layer and choose the Paint Bucket Tool (G) to fill the new layer with #391E2A color. Place the layer under the woman’s layer.
Create Dynamic Art using Glows and Lighting Effects in Adobe Photoshop CS5
Set the Blending mode for this layer to Lighten.
Create Dynamic Art using Glows and Lighting Effects in Adobe Photoshop CS5
Click Create new fill or adjustment layer from bottom part of the Layers panel and click to Curves to adjust the curve shape as shown to make a little color corrections.
Create Dynamic Art using Glows and Lighting Effects in Adobe Photoshop CS5
Place the layer under the woman’s layer. We’ve got the next result:
Create Dynamic Art using Glows and Lighting Effects in Adobe Photoshop CS5


sumber: http://www.adobetutorialz.com/articles/30971108/1/create-dynamic-art-using-glows-and-lighting-effects-in-photoshop-cs5

car untuk mengubah ip address di ubuntu


 Jika Anda adalah orang yang baru mencoba Linux khususnya distro Ubuntu, mungkin sempat kebingungan bagaimana cara mensetting IP address statis di Ubuntu. Misalnya Anda tidak punya koneksi di rumah sendiri tapi ingin mengupdate Ubuntu, terpaksa membawa laptop ke warnet untuk disambungkan ke LAN warnet. Nah, begitu disambungkan ke kabel Anda bingung, karena IP harus di set ke statis/manual sedangkan Anda tidak terbiasa mengubah settingan IP di Linux/Ubuntu. Ikuti langkah-langkah berikut ini untuk setting IP address di Linux/Ubuntu.

Untuk mengedit settingan IP di Ubuntu kita bisa menggunakan 2 cara, yaitu dari command line (Terminal), dan setting dari Network Manager (GUI).

Melalui command line

Inilah cara yang paling mudah dan cepat. Anda hanya perlu mengedit file /etc/network/interfaces dan mengisinya dengan settingan Anda. Caranya seperti ini:
1. Buka Terminal, jalankan perintah berikut:
sudo nano /etc/network/interfaces
Saat jendela editor nano terbuka, akan tampil seperti ini (default):


2. Misalnya Anda mempunyai koneksi eth0 yang terhubung, dan ingin memberi IP address baru seperti ini:
IP192.168.1.120
Subnet mask / Netmask255.255.255.0
Gateway192.168.1.254
yang perlu Anda lakukan adalah menambahkan baris berikut ini:
auto eth0
iface eth0 inet static
address 192.168.1.120
netmask 255.255.255.0
gateway 192.168.254
*) Anda bisa mengetiknya langsung pada editor nano atau dengan mengcopy-nya langsung (Ctrl-Shift-V untuk paste ke Terminal) 
Hasilnya akan seperti ini:


3. Save, cara tekan Ctrl-X dan Y.
Selanjutnya kita masih harus mengedit DNS Server, kita perlu mengedit /etc/resolv.conf:
1. Buka Terminal, jalankan perintah ini:
sudo nano /etc/resolv.conf
2. Masukkan DNS, misalnya anda ingin menggunakan DNS dari Google (8.8.8.8), masukkan dengan format seperti ini:
nameserver 8.8.8.8
Hasilnya akan seperti ini:


*) saya menggunakan DNS Google hanya sebagai contoh, atau alternatif dari dns yang ditentukan oleh ISP
Setelah semua settingan diatas di isi, kita harus membuat agar sistem membaca atau mengenali settingan yang kita buat, jalankan perintah ini pada Terminal:
sudo /etc/init.d/networking restart

Melalui NetworkManager (GUI)

Ini adalah cara yang paling banyak disukai orang karena tidak perlu mengetik di Terminal, tapi membutuhkan proses yang sedikit lebih panjang.
1. Klik-kanan pada icon networkmanager (ditunjukkan dengan icok jaringan), lalu pilih Edit Connections.


2. Pada tab Wired (koneksi kabel), klik pada tombol Add untuk menambah settingan baru .


3. Masuk ke tab IPv4 Settings dan isi settingannya:


4. Setelah semua settingan sudah diisi, klik tombol Apply untuk menerapkan settingan.
5. Klik pada NetworkManager dan pilih settingan yang baru saja dibuat.


Anda sudah berhasil !!!
sampai disimi dulu.........


sumber:appbuntu

cara mengetahui ip address komputer atau laptop


Cara Mengetahui IP Address Komputer /Notebook buat sebagian orang yang sudah terbiasa dengan internet & komputer pasti sudah mengetahuinya, tapi saya tak jarang juga sobat ilmuonline yang belum tahu cara mengetahui ip address komputerdengan cara yang cukup mudah dan simple ini.
Mungkin sobat ada yang belum tau, apa itu IP address ? Jadi secara sederhana IP Address dapat di artikan identitas suatu komputer yang sedang terhubung dengan jaringan /internet. yang berfungsi sebagai alat identifikasi host dalam sebuah jaringan dengan begitu semua komputer yang terhubung dengan jaringan /internet pasti mempunyai IP Address yang unik. “kecuali kalau di warnet /tempat-tempat umum biasanya mempunyai IP Address yang sama”.
Untuk kali ini saya akan coba share cara mudah mengetahui IP Address komputer /notebook, yang bisa di simak pada penjelasan di bawah ini :
1. Silahkan masuk ke perintah command dengan cara Start Menu ->> run atau logo windows + R (tombol keyboard yang ada logo windows+r di tekan secara bersamaan) dan ketikkan cmd ->> enter atau OK.
perintah cmd Cara Mengetahui IP Address Komputer /Notebook
2. Setelah muncul layar command, silahkan ketikkan “ipconfig” tanpa tanda petik “, maka akan muncul informasi mengenai IP Address dari komputer /notebook sobat.
IPv4 Address : merupakan IP Address dari komputer sobat, dalam contoh IP address Notebook saya 10.229.010.09 seperti yang terlihat pada gambar di bawah ini
ip address 450x283 Cara Mengetahui IP Address Komputer /Notebook
Sekarang sudah tau kan IP Address PC sobat ! saran saya gunakanlah dengan bijak dan jangan memanipulasi IP address.
pasang iklan

Recent Post